Hi everybody, it’s Christina. Welcome back to my channel. If you’re new here, I am into painting furniture and repurposing stuff that I already have around the house, or stuff that you can get on the cheap versus buying new.
And today, I’m gonna be doing a tutorial that’s gonna be perfect for beginners. We’re gonna be working with Annie Sloan chalk paint, as well as General Finishes Java gel, and just doing a really easy beginner’s guide to doing over a side table.
If you haven’t subscribed to my channel, make sure you do that before you leave here. If you like what you see, please give me a thumbs up, or leave a comment in the section. And let’s get started.
Okay, today I’m gonna be redoing this little side table. I actually got this from my neighbor. She had purchased both of these I think through Craigslist or something; didn’t need the second one, and everybody knows they can always offer me free furniture.
You definitely don’t want your first project to be something you really care about, whether it’s your kitchen table or maybe it’s like your grandmother’s dining set. You wanna play around with stuff first, figure out how to use these products, really get your techniques, style, and then tackle a big project like that, an end table, a side table.
Even if it’s a side dresser, if it’s something that you get for free, that you find on the side of the road, or that you get for $5 at Goodwill, those are like the best type of things to start off with.
So, today, we’re gonna be doing really, easy beginner techniques. No distressing, I know, which is like very rare for me. I just wanna help you get your feet wet, and just not have a lot of steps today. I am gonna do a two-tone finish. I’m gonna do Java gel on the top, and then we’re gonna use Annie Sloan chalk paint on the apron and the legs of the side table.
I will put links to all the products I use today in the description box, so go check that out. If you’re just sort of purchasing anything that those are all affiliate links through Amazon. So if you do purchase anything through those links, I will get a small commission. I really do appreciate it because that helps me keep my channel running and helps me keep the blog running, so thank you again for your support.
Okay I think I’ve given you all the info, so I’m gonna grab all my stuff and zoom you in and we will get started on this tutorial.
So, the first thing you wanna grab is your nitrile gloves. These are reusable, but I also use disposable ones a lot.
Then you’re gonna grab your odorless mineral spirits, and pour it in a little bowl and either have a sponge with a scratchy surface, or a scotch pad. And you’re just gonna rub this down over the entire top where you’re gonna stain.
You’re not stripping the surface, we’re just cleaning it down to get all the dirt and grime off to help with the adhesion of the stain.
Okay, the next thing you’re gonna do is grab some 220 sanding paper and put that on a sanding block, and we’re gonna rough up the surface of this top. Again, we’re not stripping off the finish that’s on the top here. We’re just roughing up the top to give the stain something to stick to.
If you have any big gouges or water stains on your tabletop, you’ll wanna put a little extra love into those spots, maybe even go down a little bit on your sandpaper, and really smooth those areas out, before you stain.
And when you’re finished with sanding, just grab a tech cloth and wipe up all that dust before we grab our stain.
Alright, we’re ready to start staining the top. So I’ve grabbed my General Finishes Gel Stain in Java. This is the darkest color that they have. I’ve used this before on my banister tutorial, so I’ll link that above, if you wanna check that out.
I am gonna be using a different technique with this today. We’re just gonna be painting it on full strength and not wiping it off at all.
This is an oil-based stain and it is really concentrated in pigment, so you wanna give it a big stir, just so you mix up everything appropriately. And then we’re just gonna start painting this on with a foam brush. These are really affordable. You can pick them up from a hardware store for under a dollar, and it is what General Finishes uses in all their videos. So that’s what I’m using today.
So as you’re applying this, just make sure that you’re going with the grain and you’re getting a good amount of stain on there. Don’t make it too thick and don’t worry if some of that wood is poking through, because this is our first coat, and we will cover up everything on our second or third coat.
Okay, so I’m gonna speed up the process for you here. Just a quick tip: keep a wet edge as you work in sections and as you’re going do one swoop from the bottom to the top, to just clear out those brushstrokes.
So, here’s a close-up of what it looks like after your first coat. As you can see, you can still see some of that honey oak color coming through, so don’t worry about that if you see that. And here’s a shot of it dry, you do wanna let this dry for 48 hours, before you put your second coat on. You can tell if an oil-based finish is dry, if it’s no longer tacky, cool to the touch, and if you can press a cotton ball over the surface and nothing sticks. When in doubt, wait longer.
You don’t have to sand-in between coats, so we’re just gonna go ahead and apply the second coat, just exactly the same way we applied the first. And please, make sure that you’re reading all the safety information that’s on your can. You wanna dry the stuff out after you’re done working with the outside. It is flammable, so please, please follow all the instructions on the can.
So, here’s what your coverage will look like after the second coat. For our top coat, you’re gonna wanna wait 72 hours for it to dry since we are putting a water-based coating on top of the oil stain and it needs to be completely dry, so wait 72 hours.
And our top coat is the General Finishes High Performance Flat. I just really love the finish of this, because it doesn’t give a super shiny finish.
Before you get started, wipe down your top with a tack cloth, just to get any dust off that may have accumulated while it’s drying.
So go ahead and give this a quick stir. I do use a foam applicator to put this on. If you want, you can use a brush. I just prefer using the applicator. I find it easier and they’re really cheap.
For application of this top coat, we’re gonna put it on really similarly to the way we put the stain on. You just wanna do a thin layer keep a wet edge as you’re working across. Again, I do that stroke all the way from the bottom to the top, just to get a clean stroke.
Do a small section and then move on, and don’t go back and rework an area that you’ve already put on.
And for time’s sake, let’s speed this up again.
And here’s a quick tip on this finish: you can actually put this in a Ziploc bag and save it and keep reusing it ‘till you’re done with the project.
And dry time for that top coat is two to four hours. So while it’s curing, we are going to go ahead and start painting that apron with our Annie Sloan Chalk Paint in Old White.
First, we need to prep the piece and while we’re doing that, I’m gonna just flip my chalk paint upside down and just set it down beat right beside the piece. We’re gonna grab some hot water and just a little dish soap and a sponge and wipe down the portion that we are gonna paint.
Don’t underestimate this step. Look how dirty it is.
So go back over with just a wet, clean sponge and wipe off any of that soap residue and then you’re gonna let this dry.
And while it’s drying we can go ahead and tape off any areas that we don’t want the paint getting on, so I’m just taping underneath the tabletop.
And go ahead and take any of your drawers out, and remove your hardware.
Okay, we’re ready to start painting. So I have grabbed my natural bristle Purdy sash brush. It’s one of my favorite brushes to paint with. It has been well-loved.
So grab any kind of container for your paint to go in. I have this glass jar, because I can put a lid on it and close it up and save it for later. Pour your paint in there. Grab a spray bottle with some water, put about five squirts in there. And then you’re gonna stir that up, just to, just to thin it out a little bit. I have the spray bottle again and give your paintbrush a little spritz. And then we’re gonna start painting on because we are going for a smooth finish and not a distressed look.
I want you to paint with a grain and making smooth strokes and keep spraying that paint brush with that water bottle. If your paint thickens up on you, it’s just gonna help it keep it nice and smooth and kind of get rid of some of those brush marks.
So, again, work in small sections and once you’re finished with that section, do that long stroke from one end, all the way to the other, just to smooth out those brush strokes. Watch out for drip marks; you’re gonna wanna clean those up as you’re going along, just so you don’t have to go back and sand them later.
And here, I am painting the drawer front, and I’m just speeding this up into double-time just to move it along. But again, you see, I’m using the same technique, going with the grain, and at the end I’m gonna smooth everything out from side to side.
The dry time for this paint is about one to two hours, so we’re gonna hop back and put the second coat of High Performance topcoat on our table top
So, I am grabbing some super fine steel wool just to sand a little bit in between coats. You can also use a really broken in 220 sanding pad or 400 sandpaper. I just prefer using the steel wall, because I feel like it doesn’t break down my stain at all.
So I’m just gonna take the sand lightly above the surface. As you can see, it’s kinda dusting up a little bit. We’re not taking off finish; we’re just roughing it up a little bit to give the second coat something to stick to.
The process for putting on the topcoat is exactly the same as we did it the first time. So, follow all those steps and, again, once this is completely dried, again for another two to four hours, you can go ahead and put that third coat on. General Finishes recommends doing three coats minimum. You can add more, if you want to, based on wear of your piece.
And before you add that third coat, don’t forget to rough it up with that steel wall a little bit. Clean off your dust with your tack cloth, and then add that third coat.
And now, back to painting our apron. We’re gonna grab our chalk paint again, put it in our container. This time, you’re gonna thin it out a little bit more than the first coat. Probably, do about ten to fifteen sprays with your water bottle. Stir that up. So this is the consistency you’re going for, a little bit thinner than that first coat. We’re gonna spray down our brush, and then just paint this on the same way we did the first coat, going in the direction of the grain, and really smoothing out those brushstrokes.
Now once the chalk paint is dry, you’re gonna wanna seal that. And today, we’re gonna be using the General Finishes High Performance Flat. I just did a video comparing this with using Annie Sloan Wax in Clear, so I’m gonna link that up above if you wanna check it out.
I thought this would be easier, just to do the same process you’re used to doing on the tabletop, instead of using the wax today, and it will give you a little bit more of a durable finish. So this is the exact same process that we used on the tabletop. You just wanna be a little bit more careful and use a really thin layer again, because when you’re working on a vertical surface like this, it will tend to drip and run on you, so you definitely wanna use a thin amount of product, watch for those drip marks, and really smooth those out.
When you go to sand-in between coats, here I’m gonna recommend you using the 220 sanding pad, or if it’s brand new, a 400 sanding pad, versus the steel wool, just because of the shedding factor with the white.
One more thing I wanna show you guys, you will get these little tiny hairs, especially when you’re working with white. You’re not in a static free environment. Please don’t freak out about these. Take a step back from your piece. You’re not gonna be able to see them. No one’s ever gonna notice them. You have to let your inner perfectionist go.
So, again, you’re gonna do three coats, just like we did on the top.
I am replacing my hardware today, so I had a little funky piece of hardware. So, I’m actually drilling some extra holes to put on a little cup pull that I found at the hardware store. Sometimes, a new piece of hardware can really make a really big difference and I’m a sucker for a cup pull.
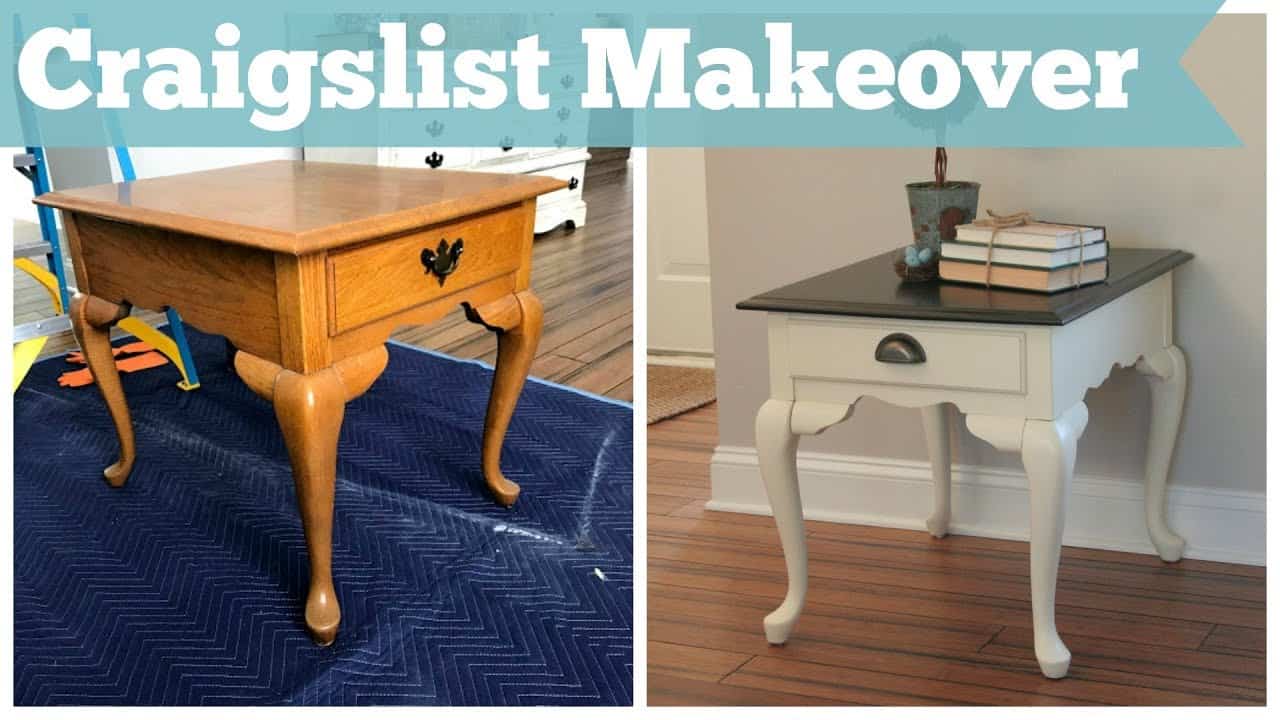
We are finally done here. This is the before and here is what we look now, completed. And just for a little bit of fun, I styled it up for you.
I hope you guys like this beginner’s tutorial. I hope you can try it out. Let me know how it goes for you. Send me your before-and-afters. I love seeing those.
If you like this video, please give me a thumbs up. Don’t forget to subscribe before you leave. Turn on those notifications and I will see you guys next time.
Source: Christina Muscari